A broken suitcase wheel can turn a simple airport transfer into an exhausting struggle. One minute, your luggage rolls smoothly; the next, it drags sideways, rattles loudly, or refuses to move. Learning how to fix a broken suitcase wheel can save time, money, and unnecessary replacement costs in 2026. The repair is often manageable with basic tools, careful inspection, and the correct replacement part.
Not every damaged wheel needs the same solution. A loose screw may require only tightening, while a cracked housing, bent axle, or worn bearing needs more attention. From practical repair experience, the safest approach begins with identifying the exact failure. Check the wheel size, mounting style, screw position, and suitcase material before ordering parts. A wheel that looks compatible may still sit too low or rub against the case. Small details matter.
Take your time.
This guide explains reliable repair methods for common suitcase wheels, including twin-wheel and spinner designs. It also covers when a repair is sensible and when replacing the entire wheel assembly is safer. Some fixes may not look perfect, especially on older luggage. That is acceptable if the wheel turns freely and the case remains stable. However, a rushed repair can damage the shell or cause another failure during travel. Test the suitcase on a clean floor, then over a short distance, before trusting it with a full load.
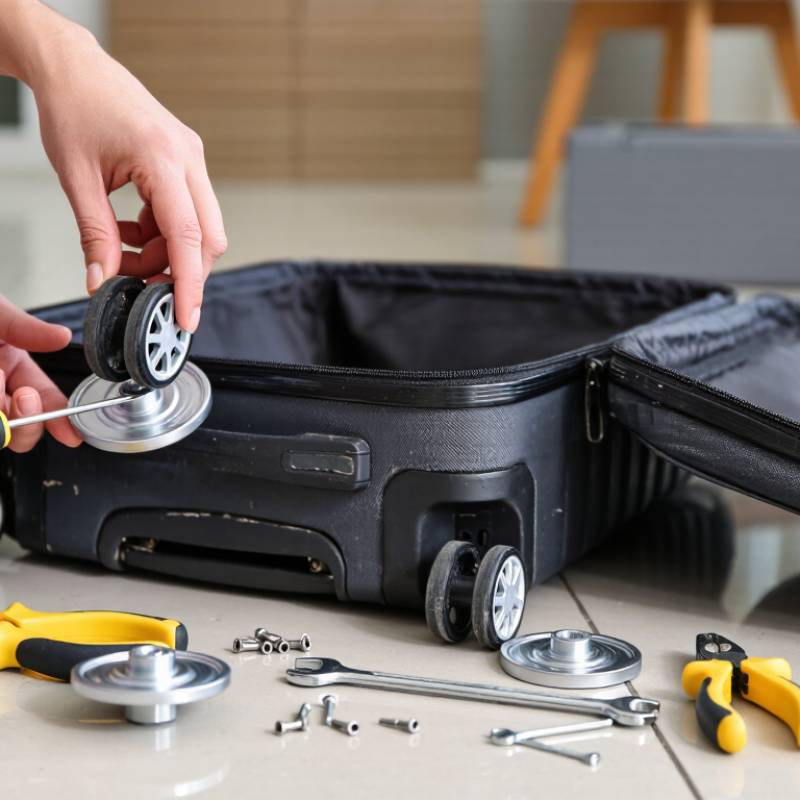
A broken suitcase wheel is not always a broken wheel. SITA’s 2024 Baggage IT Insights reported 6.9 mishandled bags per 1,000 passengers in 2023. This figure covers all baggage problems, not wheel damage specifically. Still, rough handling can bend axles, crack wheel housings, or loosen mounting screws. Place the suitcase on a flat floor. Roll it slowly. Watch for wobbling, grinding, flat tread, or uneven contact. A wheel that spins freely by hand may still fail under luggage weight.
Use a bright flashlight first. Check the wheel, axle, bracket, and nearby suitcase shell. Measure wheel diameter, width, axle length, and screw spacing before ordering parts. Useful tools include a Phillips screwdriver, hex keys, small pliers, a socket wrench, a ruler, and work gloves. A caliper gives better measurements. Do not rely on appearance alone. Two wheels can look identical but use different axle widths.
My first inspection is not always perfect. I once blamed the wheel when a loose bracket caused the wobble. Test the suitcase again after removing its contents. If the wheel is cracked, seized, or visibly tilted, replace it. If only the screw is loose, tighten it carefully without crushing the plastic shell. Riveted assemblies may require drilling and new hardware, which needs steadier control. Keep every washer and spacer. Missing one can make the repaired wheel scrape the frame.
Identify the Suitcase Wheel Damage and Required Repair Tools
The chart shows typical hands-on repair times for common suitcase wheel problems. Loose fasteners usually require only a screwdriver or hex key, while cracked wheel housings and seized axles may require pliers, a wrench, replacement hardware, and a new wheel assembly. Actual time depends on the suitcase construction and access to the wheel mount.
Empty the suitcase completely before touching the wheel. Place it on a folded towel, with the damaged corner facing upward. This prevents scratches and keeps the shell supported. Inspect the wheel housing carefully. Look for screws, rivets, or a visible axle. Photograph the assembly before removal. That small step can prevent confusion later.
Open the interior lining if necessary. Many wheel fasteners hide beneath a fabric flap or zipper. Use the correct screwdriver, and press down firmly while turning. Cover nearby plastic with masking tape. It reduces slipping damage. Hold the nut inside the case with pliers. Never twist the entire housing. If the screw feels stuck, pause and apply gentle hand pressure. More force is not always better.
Remove screws one at a time, then place them in a small container. Do not pry against the suitcase shell. A thin plastic tool is safer than a metal blade. Riveted wheels require extra caution. Drilling can crack thin luggage plastic when the bit catches. In that situation, a luggage repair technician is the safer choice. I have found that rushing this step causes more damage than the broken wheel itself. Check the mounting plate for hidden clips before pulling it away. Stop if the shell bends, creaks, or changes shape.
A replacement wheel works only when its size matches the original assembly. Measure the wheel diameter, width, axle length, and mounting-hole spacing. A small mismatch can make the suitcase wobble or drag. I usually photograph the old assembly before removing it. That simple record prevents confusion later.
Remove damaged screws carefully, then inspect the wheel housing for cracks. Set the new wheel in the same direction as the old one. Insert the axle through the housing and wheel bearings. Add washers where they were originally installed. Tighten the nut until the wheel stays secure, but still spins freely. Too much pressure can damage the bearing. Too little allows dangerous side movement. Avoid guessing here.
Check the fastener after a short test roll. I once tightened a replacement too quickly and missed a slightly crooked washer. The wheel turned, but the suitcase pulled sideways. Small mistake, obvious result. Correct the alignment, then apply a suitable removable thread-locking compound if the fastener design permits it. Do not glue moving parts. Roll the suitcase across a smooth floor, then over a doorway edge. Listen for clicking, scraping, or looseness. Recheck the axle after several trips, because new parts can settle slightly. Repair quality is proven by stable movement, not appearance.
How to Fix a Broken Suitcase Wheel in 2026?
A damaged wheel can make a suitcase pull sideways, vibrate, or stop suddenly. I usually begin by checking movement before removing anything. Spin the wheel by hand. It should rotate quietly for several seconds. Then push the empty suitcase across a flat floor. Watch whether the wheel tracks straight or points inward. SITA’s 2024 Baggage IT Insights reported 36.1 million mishandled bags in 2023, equal to 6.9 bags per 1,000 passengers. A weak wheel can increase handling stress, especially when the case is heavy.
Remove loose threads and inspect the axle, brackets, washers, and wheel housing. Replace damaged parts with matching axle width and wheel diameter. Tighten the axle until the wheel has no sideways play, but do not crush the bearing. The suitcase should stand evenly on all wheels. My first repair felt successful, yet the case drifted under load. I had aligned the wheel visually, not mechanically. That mistake matters.
Tips: Test the repaired wheel with the suitcase empty, then add your normal travel load. Pull it over tile, carpet, and a doorway threshold. Stop if the wheel wobbles, scrapes, or changes direction. Check alignment again after ten minutes of movement. SITA’s baggage data also shows that transfer handling remains a major source of mishandling, so secure wheel covers and firm mounting deserve attention. A short test is useful. A realistic test is better.
| Step | Inspection or Test | What to Check | Practical Pass Criteria | Recommended Repair or Adjustment | Risk Level |
|---|---|---|---|---|---|
| 1 | Identify the wheel assembly | Determine whether the suitcase uses a single wheel, dual wheel, spinner assembly, or a replaceable wheel housing. | The replacement part matches the original wheel diameter, axle width, mounting pattern, and wheel-housing shape. | Measure the original wheel before ordering a replacement. Record wheel diameter, width, axle diameter, and the distance between mounting holes. | Low |
| 2 | Check for visible damage | Inspect the wheel tread, hub, axle, screws, housing, and the suitcase shell around the mounting points. | No cracks extend through the housing or suitcase shell, and no sharp fragments interfere with rotation. | Remove loose debris and replace cracked wheels, bent axles, stripped screws, or damaged wheel housings. A cracked shell may require structural repair rather than a wheel-only repair. | Medium |
| 3 | Test free wheel movement | Lift the suitcase so the wheel is off the ground, then spin it by hand and listen for grinding or clicking. | The wheel rotates smoothly without binding, scraping, or a repeated side-to-side wobble. It should continue turning briefly after a firm manual spin. | Clean hair and thread from the axle. Tighten the axle only until side play is controlled; excessive tightening can prevent the wheel from turning freely. | Low |
| 4 | Measure wheel side play | Push the wheel sideways while holding the suitcase steady. Use a ruler or feeler gauge if available. | For a typical small suitcase wheel, side movement is preferably no more than approximately 2 mm. Some designs may allow slightly more movement. | Replace a worn bushing, spacer, axle, or wheel if the movement is excessive. Do not compensate for a bent axle by overtightening the fastener. | Medium |
| 5 | Check wheel alignment | Place the suitcase upright and roll it slowly in a straight line for 2–3 metres on a smooth, level surface. | The suitcase tracks straight without pulling consistently to one side, dragging, or requiring repeated correction. | Confirm that the wheel housing is seated flat and that all mounting screws are evenly tightened. Replace a bent bracket or distorted housing. | Medium |
| 6 | Check wheel contact | Observe whether all wheels touch the floor evenly when the suitcase is upright and lightly loaded. | Each intended ground-contact wheel supports the case without one wheel visibly hanging above the floor or carrying an abnormal share of the load. | Look for a loose mounting plate, uneven fasteners, a bent axle, or a deformed wheel. Correct the mounting position before testing with a heavier load. | High |
| 7 | Test 360-degree rotation | For spinner-style wheels, rotate the suitcase through a full turn while moving it slowly in every direction. | The wheel assembly swivels smoothly through 360 degrees without catching, twisting the housing, or striking the suitcase body. | Remove dirt from the swivel joint and inspect the upper bearing or pivot. Replace the complete assembly if the swivel plate is bent or cracked. | Medium |
| 8 | Perform a gradual load test | Test the suitcase empty, then at approximately 25%, 50%, and 100% of the luggage weight you normally carry. | The wheel remains aligned and rolls smoothly at each stage, with no new cracking, excessive flexing, or loosening. | Stop immediately if the wheel housing shifts or the shell creaks. Recheck fasteners and mounting structure before adding more weight. | High |
| 9 | Check load stability on uneven ground | Roll the loaded suitcase over a short section of carpet, a doorway transition, and a shallow pavement seam at walking speed. | The case remains stable, does not tip unexpectedly, and the wheel does not jam when crossing minor surface changes. | Reduce the load or redistribute heavy items low and near the centre. Replace a wheel that repeatedly catches or deforms under normal use. | High |
| 10 | Verify fastener security | Inspect screws, nuts, rivets, and axle caps after the movement and load tests. | No fastener has backed out, and the wheel assembly remains firmly attached with no new movement. | Use the correct replacement fastener and a suitable thread-locking method where compatible with the hardware. Avoid adhesives on moving axles or swivel bearings. | Medium |
| 11 | Complete a final safety roll | Roll the suitcase for at least 5 minutes on a smooth surface, including straight movement, turns, stops, and reversing. | The repaired wheel stays quiet, aligned, and attached; the suitcase can be controlled without unusual force or repeated steering correction. | Reinspect the wheel after the test. If any looseness, wobble, cracking, or heat from friction appears, do not use the suitcase for travel until repaired. | High |
| Safety note: The pass criteria are practical workshop guidelines, not a universal manufacturer specification. Wheel dimensions, allowable side play, and safe luggage loads vary by suitcase construction. Replace the complete wheel assembly when the housing, mounting plate, or suitcase shell is structurally damaged. | |||||
After repairing a cracked suitcase wheel, I learned that replacement was not the real solution. Repeated impact had damaged the wheel housing. Before every trip, roll the suitcase across a hard floor and listen for clicking, scraping, or wobbling. Check the axle, screws, wheel cover, and surrounding plastic. A loose screw should be tightened gently. Overtightening can restrict movement or crack the housing.
Pack heavier items near the case’s center. This keeps pressure away from the wheels. Do not exceed the suitcase’s recommended load. An overloaded case strains wheel bearings, handles, and seams during every turn. I also avoid dragging luggage sideways over curbs. Lift it briefly instead. Small habits matter.
Keep wheels free from sand, hair, and sticky residue. After travel, wipe them with a dry cloth and inspect deep cuts. Do not apply excessive oil, because it can trap dust. During airport transfers, use smooth routes when possible and avoid dropping the case from vehicle trunks. A protective cover may reduce scratches, but it cannot prevent impact damage. I sometimes skip these checks when rushing, and that mistake has cost me another repair. Store the suitcase upright, with no heavy objects pressing against its wheels. If a wheel remains unstable after tightening, replace the damaged hardware before traveling.
Place the empty suitcase on a flat floor. Roll it slowly and watch for wobbling, grinding, flat tread, or uneven contact. Not always.
Check the axle, bracket, screws, wheel housing, and nearby suitcase shell. A loose bracket can imitate a damaged wheel.
Prepare a Phillips screwdriver, hex keys, small pliers, a socket wrench, ruler, gloves, and flashlight. A caliper improves measurement accuracy.
Measure the wheel diameter, wheel width, axle length, and screw spacing. Similar-looking wheels may have different axle widths.
Replace it if the wheel is cracked, seized, or visibly tilted. Tighten only loose screws, and avoid crushing the plastic housing.
Riveted assemblies may need careful drilling and new hardware. Keep every washer and spacer. Missing one may cause scraping.
Keep heavy items near the suitcase center. Avoid overloading the case and dragging it sideways over curbs. Lift it briefly.
Wipe away sand, hair, and sticky residue with a dry cloth. Inspect deep cuts and avoid excessive oil, which traps dust.
Stop traveling with it until the damaged hardware is replaced. Store the suitcase upright without heavy objects pressing on the wheels. My checks are not always consistent.
Learning how to fix a broken suitcase wheel starts with identifying the damage, such as a cracked wheel, bent axle, loose bracket, or worn housing. Gather basic repair tools, including screwdrivers, pliers, a wrench, replacement hardware, and a compatible wheel. Carefully remove the damaged wheel or wheel assembly without cracking the suitcase shell or stretching nearby fabric. Keep the screws and washers organized so the new parts can be installed in the correct positions.
Install the replacement wheel firmly, making sure it sits straight and that all fasteners are tightened without being over-tightened. Afterward, test the wheel on a flat surface to check smooth movement, alignment, turning response, and stability under a reasonable load. To prevent future damage, avoid dragging the suitcase over rough ground, distribute weight evenly, lift it over stairs and curbs, and store it in a dry place when not in use. These steps provide a practical, careful approach to how to fix a broken suitcase wheel and extend the suitcase’s service life.

ESRT Life